Reverse osmosis systems are arguably the best water treatment system available to homeowners, but they can also come with their share of issues. To successfully troubleshoot your reverse osmosis system, you should first identify the root of the problem. The various parts of an RO system work together to provide clean water, so one problem could result from multiple components. Reverse osmosis troubleshooting requires a systematic approach to eliminate possible issues. In this article, you can find the right solutions to problems with your reverse osmosis system.
Table of Contents
Key components of an RO systemHow to fix common reverse osmosis system problemsHow to test RO system flow rateKey components of an RO system
Knowing the following components of your reverse osmosis system will help you during the troubleshooting process.
- Filters: Prefilters provide sediment and chlorine protection. Sediment can damage or clog the flow restrictor. Chlorine can destroy the membrane material by oxidation. Postfilters provide a fresh pass through carbon on the way to your faucet, ice maker, or refrigerator.
- Membrane: The RO membrane operates on pressure, which is the driving force that pushes water through the system. Without adequate driving force pressure, water production and TDS rejection will be negligible. Production rate varies based on feed pressure and water temperature.
- Flow restrictor: The flow restrictor provides resistance to create driving force on the RO membrane while efficiently metering water flow rate to the drain. It's sized according to the membrane output rating and disrupts membrane output if not correct.
- Check valve: The check valve is placed at the membrane permeate (filtered water) outlet. The check valve protects the membrane from back pressure and allows pressure to build with the tank filled, activing the ASO valve. Without it, the RO system will not shut down and could potentially cause membrane failure due to backflow.
- ASO (automatic shut-off) valve: This device monitors feed and tank pressures. When tank pressure reaches 2/3 of line pressure, the ASO valve hydraulically closes, stopping water flow.
- Storage tank: Pressure tank (hydro-pneumatic) is the term used for the style of storage tanks used with RO systems. The tanks are divided into two chambers, one for water and one for air. As the tank fills with water, the separating diaphragm expands into the air side and increases the pressure on that side. This pressure pushes the water back out of the tank to the faucet or another point of use. Loss of pre-charge air pressure or diaphragm integrity can cause little or no flow at the faucet.
- Drain saddle: RO systems have a flow to the drain that carries contaminants away. The waterline from the air gap faucet connects to the sink drain line with a drain saddle.
- Air gap: Plumbing codes require any cross connection (feed supply on one side, drain connection on the other) to have backflow prevention to prevent drain or sewage water from backing up into the drinking water supply.
- Feed pressure: The water pressure entering the RO system is crucial to the system's performance. It's important to consider the impact high levels of TDS and low pressure can have on a system's performance.

How to fix common reverse osmosis system problems
The most common RO system problems include lack of water, leaks in the system, strange noises, or changed water quality. Continue reading to discover solutions to common reverse osmosis problems.
1. RO storage tank problems
Check the tank to see if it is full of water. If it is full, open the faucet and check the flow rate. If nothing is flowing, check to make sure the valve is in the open position (handle in line with the tubing). If everything looks right, check to see if any pressure is in the tank with a tire pressure gauge. If none, add pressure with a bicycle pump with the faucet open until the tank empties. Once the tank is emptied, regulate the pressure to 5-7 psi. If water spurts out when checking for pressure, then the tank's diaphragm has lost integrity, and the tank should be replaced.
If the tank is full and pressure exceeds 20-25 psi, with no water to the faucet, make sure the tank is functioning. First, turn off the tank valve, then, disconnect the tank tube from the RO system and see if water flows into a bucket when the valve is on. If so, check the postfilter to make sure it's not clogged.
2. No, slow, or very little water
If your RO system is outputting slowly or not at all, check the following in your system:
- Permeate flow rate: Close the tank valve, and then open the faucet handle. After a steady drip begins, measure the output for 60 seconds.
- Drain flow rate: Disconnect the tubing connection where the 3/8 tube hooks to the drain line. Allow it to run into a large measuring cup for 30 seconds.
- Feed pressure: At this point, recording what the feed pressure is in your system would help, but that may not be possible. If you're installing your system for the first time, there's no set pressure reading to go on, but this could be part of the issue.
- Tank pressure: A simple tire gauge applied to the air valve under a blue cap on the side of the tank will give a close reading. It should be 5-7 psi.
- Improper hook up: Look at pictures of installation that show feed connection and drain connection.
3. Constant run to the drain
The reverse osmosis system shuts down when tank pressure reaches 2/3 of supply line pressure and the ASO valve closes. Constant water running to the drain simply means that the ASO is not shutting off. The ASO operates if the membrane, flow restrictor, tank, and check valve are all performing properly. You can test this quickly by turning the tank valve off to see if the ASO stops flow to the drain. This may take a few minutes depending on membrane output.
Possible causes:
- Flow restrictor is missing or failed. Flow rate test should identify a large amount of water to the drain. This is accompanied by lots of noise.
- Tank is not filling enough to build needed pressure. A flow rate test should identify if there is a membrane production issue.
- ASO valve is stuck in a closed position. This problem is solved by completely disconnecting the valve to make sure all pressure is off the assembly.
- Check valveis bleeding pressure, preventing the system from reaching shut off pressure. Test this with a full tank of water while the tank valve is open. Turn the water supply off. If the water still flows to the drain, then the check valve is bleeding pressure. This type of failure is unusual, but still important to look for.
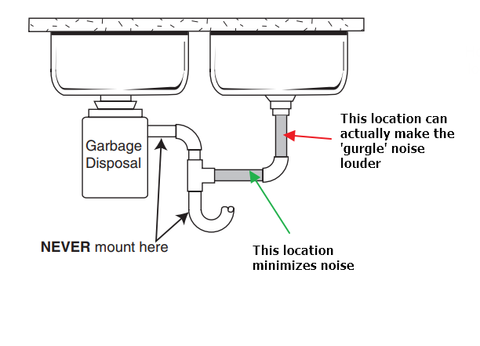
4. Noisy gurgle
Loud, noisy water running to the drain is typically the result of too much water to the drain. Use the drain flow rate test to identify this problem. The location of the drain saddle could be another contributor.
Locating the saddle on the crossover is best for noise reduction since a pipe placed directly under the sink may produce amplified sound. However, an RO system will always make some noise when it runs over.
5. Taste or odor
Taste and odor are mostly associated with filters that need changing, a complete tank and system sanitation need, or a membrane failure caused by high TDS breakthrough.
A well water application that contains dissolved gas, like hydrogen sulfide or methane (rotten egg smell), will concentrate and enhance the odor. You may not know you have a hydrogen sulfide issue until it concentrates through the membrane. On-board carbon filtration will not hold gases for long, so you may not detect an odor in a new system for several days. These issues must be corrected prior to installing a new reverse osmosis system.
6. Fitting or housing leaks
Housing leaks are almost always O-ring related. Either the O-ring is not where it should be, or it has been compromised. Reused O-rings may stretch when removing the housing to change filters. It's always a good idea to have an extra set of O-rings and some silicon O-ring lubricant on hand.
Why a fitting may leak
Tubing is not pushed fully into the fitting to create a proper seal. Small diameter tubes, such as 1/4 and 3/4 will insert nearly 1" into the fitting. To ensure the seal, make a mark on the end of the tubing at 3/4", and make sure the line disappears when the tubing is inserted.
Tubing was not cut straight. Thus, it did not pass through the internal O-ring for a proper seal.
A deep scratch on the tubing is allowing water to pass through. Each time tubing is inserted then released from fittings, the tubing gets scratched. Eventually, these scratches become deep enough that the O-ring can no longer seal it completely. It is a good idea to replace any worn or scratched tubing that inserts into a fitting.
7. Leaks from air gap faucet
These leaks are common in newly installed RO systems. The air gap directs water from the RO system through an air gap or backflow prevention device on the way to the drain. Water flows from the air gap to the drain by gravity alone. Leaving too much tubing on this connection is the most common installation error. If the tubing is not as straight as possible to the drain saddle connection, water will come out of the air gap hole in the base of the faucet, especially with declined and inclined connections.
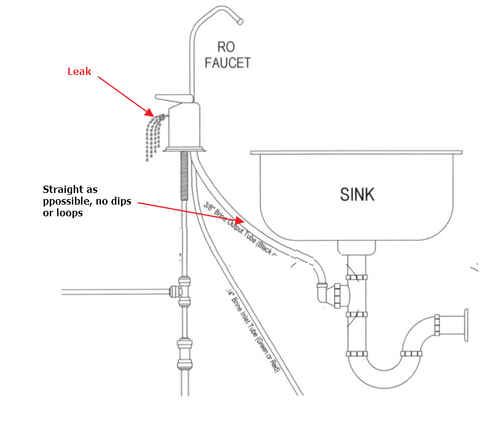
Other causes for system malfunction could include a clogged drain line or connection where the tube attaches to the drain. This can happen over time as debris collects in the base of the fitting. If all is clear, then make sure the hole in the drain line itself is in line with the saddle fitting.
In rare instances, Tomlinson RO faucets can leak between the fixture’s base and neck. To fix a leak in a Tomlinson faucet, begin by ensuring the nut at the base of the neck is tightened to a seal. If the nut is tightened and water continues to leak, unscrew the nut and pull the neck out of the base. The O-ring at the bottom of the neck is likely the cause of the leak. Inspect the O-ring for any damage or deformities. If these exist, the O-ring must be replaced before reassembling the faucet. If the O-ring appears normal, coat it in vegetable oil and reassemble the neck and base of the faucet. This should allow the faucet to sit all the way down in the base, preventing leaks caused by improper seating.
How to test RO system flow rate
How to test permeate flow rate
The best way to establish membrane function is by testing the permeate flow rate. With a few exceptions, the membrane of most RO systems running directly to the tank produce the product water. By shutting the tank valve off and opening the faucet, the membrane production will flow directly to the faucet. Once the "fast drip" is consistent, collect it in a measuring cup for 60 seconds.
With normal feed pressure and water temperatures, the amount accumulated in 60 seconds should closely match the numbers on the chart below.
| Membrane Rating | Permeate Rate- ounces/min | Drain Flow Rate- (mi/min)/ ounces |
| 15 gpd | 1-1.3 | 100-110/ 3.4-4 |
| 18 gpd | 1.3-1.8 | 180/ 6 |
| 25 gpd | 2 | 250/ 8.5 |
| 36 gpd | 2.5-3 | 300/ 10 |
| 50 gpd | 3-4 | 350-400/ 11-13.5 |
| 75 gpd | 4.5-6 | 575-650/ 19-22 |
| 100 gpd | 8-9 | 730-900/ 25-30 |
| 150 gpd | 10-13 | 1200-40.5 |
How to test drain flow rate
To determine whether you have the right amount of flow restriction to provide the driving force pressure, disconnect the drain line where it connects to the drain saddle. Point the open tube into a bucket and then measure the water with a large measuring cup for 30 seconds. Multiply the results by two and compare the drain flow rate numbers to the chart above.
How to interpret results
- Both results are within the acceptable range: The problems are not the pressure, membrane, or prefilters. The membrane has adequate pressure and flow and no clogs.
- Both results are equally below the acceptable range: If the system's design allows, remove the prefilters from their housings and run the flow rate test again. If there's not change, you may have a pressure problem. If the flow rates return to the acceptable range, then you need to replace your prefilters.
- The drain flow rate is close, but the permeate flow rate is next to nothing: This could be an indication that the membrane has calcified or is scaled with hardness or the has fouled. It should be replaced, and additional pre-treatment may be required. This could also indicate high TDS and low pressure. The higher the TDS, the more pressure is needed to create reverse osmosis.
- Drain flow rate is beyond acceptable, but the permeate flow is next to nothing: Check to see if the flow restrictor is in place. If the restictor has failed or is lacking driving force pressure to the membrane, then the membrane will not produce water.
- Both the drain and permeate flows are zero: Check prefilters and make sure the water supply is on. Then, disconnect the feed line where it connects to the inlet of the system to ensure that the system is receiving water. To do so, turn the water off and disconnect the tubing. Point the tubing into a bucket as you turn the water back on.
If you have any additional questions, please do not hesitate to contact us.
Hi, I did the drain flow test, and got 32 ounces in about 30 seconds. If I’m reading your chart right, it should take 1200 minutes to get 40 ounces? (20 hours?)
I have a Watts Premier 4 filter home RO system that is about 9 years old. The system stopped producing water a few days ago and tank is completely empty. I have replaced the ASOV, verified tank has proper pressure and holding, and just tried replacing the membrane filter even though it was just replaced 5 months ago. None of these things have seemed to fix the problem. I tried checking for a flow Restrictor by removing the membrane drain line on the back of the unit but there does not appear to be one. Does this make sense that I wouldn’t have one and that the system has been working for 9 years without one? I ordered one to see if this will fix the problem but I am running out of ideas on how to fix my system. Please help!
After shutting my drinking water off water comes out of my air gap opening at faucet
My filters have been changed and my red light is still on. What would cause that?
Great question David,
If water is spraying out of the schrader valve (the valve found toward the top of the tank where you check the tank pressure), this means that the tank’s bladder or diaphragm has ruptured. The barrier between the air pressure and the water is compromised. Unfortunately, there is no way to replace the failed bladder, so you will need to replace your storage tank.
I replaced the tank and diaphragm and now I get a vibration and low hum. New filters. Went from a squeal to a hum after new diaphragm.
Our RO system is supplying reject water to the storage tank but we aren’t getting any spot-free/purified water to our separate tank. Please help.